


Riding dirt bikes leads to expensive hobby.
You've got the cost of the bike and unless your backyard connects to a trail system or the open desert expect to transport your bike to the appropriate riding spot. Did we mention maintenance? It's not like a car. Maintenance means an after-every-ride type of thing to keep your dirt bike in good mechanical condition.
The costs add up and wherever you can DIY-it, you not only invest in the machine you ride but you save money too. Most dirt bike owners perform some basic routine maintenance like oil changes, air filter replacement and even bleeding the brakes. Others prove far too complex requiring someone with know-how

You might think changing a dirt bike tire requires a mechanic, but with time and a cool-head you can easily do yourself. We won't lie - it's a pain, at first. In fact, it might even take you down a dark and maddening place, however, with the right tools, a lot of patience and some practice, expect to gain the expertise to charge your friends to change the tires on their dirt bikes. Besides, changing your own tires saves you anywhere from $20 to $60 per tire.
You remove a dirt bike tire primarily for two reasons - new tires and/or new inner tubes. A flat tire usually means a hole in the tube and regular routine maintenance tells you when to get some new rubber grip.
Tools Needed to Change Dirt Bike Tire
- Three tire irons
- Rim Shields
- Tire stand with bead breaker
- Lubrication
- Work gloves

First, loosen the rim lock. Next remove all the air out of your tire. Squeeze till the tire flattens or just remove the valve stem. The more air removed the easier your task of changing the tire.
Pop the rim lock in and use a tire iron to break the bead of the tire or use your knee and press down on the tire. Turn the tire on its opposite side and follow the same steps.
|
Good Tire Changing Stand |
Better Tire Changing Stand |
Best Tire Changing Stand |
|---|---|---|
 |
Rabaconda Dirt Bike Tire Changer 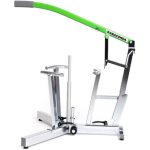 |
HP Tools Tire Change Stand with Bead  |
|
|
|
|
Features:
|
Features:
|
Features:
|
Use rim shields when using the tire iron to prevent scratching colored rims or bending the rim. Use one tire iron to lift a section of tire away from the rim and use a second iron to extract the rest of the tire from the rim. Use a third iron to lift the opposing side of the bead, if desired. Work your way around until this section of tire frees from the rim.
|
Good Rim Protector |
Best Rim Protector |
|---|---|
|
BikeMaster 2-Piece Tire Mounting Rim Protector  |
 |
|
|
|
Features:
|
Features:
|
Flip the tire around and repeat the above. Once both sides of the tire bead loose, remove the tube. Remove just one side of the bead if changing the tube only.
Whether or not you change the inner tube, tire or both - before installing inspect the bead lock and rim tape. Replace torn rim tape, however in a pinch, use duct tape in its place, if necessary. Rim tape serves as a barrier between the spoke nipples and the inner tube. We suggest installing a new tube when replacing the tires, however, you can inspect and reuse the old inner tube.
Next, liberally spray the rim and bead of the tire. Windex, soapy water or a lubricant like Maxima's SC1 work well. The lubrication allows the tire to slip over the rim easier than without and prevents damage to the rim or tire during installation.
Now comes the difficult part where patience and perseverance pays off. Take your time! If you run into trouble - take a break and come back to it.

Put the rim lock in place and, using the tire stand, place the tire (without the tube) over the rim and secure one side of the bead. You'll use the tire irons again to wrap the tire around the rim. Prior to installing the tube, fill it with a slight amount of air so it's rigid. Some people rub baby power on the tube before installing to prevent chaffing.
|
Good Tire Iron |
Better Tire Iron |
Best Tire Iron |
|---|---|---|
|
HP Tools Steel Tire Iron Spoon Set 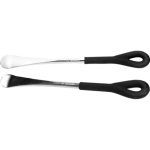 |
BikeMaster Heavy Duty Tire Iron  |
 |
|
|
|
|
Features:
|
Features:
|
Features:
|
Line-up the tube with the valve stem hole and install the valve stem first. Work the tube inside the tire. Find the rim lock and install the nut. Grab a tire iron and push the section of tire around the rim lock into the rim. Hold the first tire iron around the rim lock steady and use a second tire iron to work the rest of the tire inside the rim. A bead buddy helps in this instance to keep the opposite side from popping out. Once half the tire secures inside the rim remove the first tire iron and work on the rest of the tire.
|
Good Bead Tool |
Best Bead Tool |
|---|---|
|
Motion Pro T6 Trail Bead Buddy  |
 |
|
|
|
Features:
|
Features:
|
Over inflate the tire to get the bead to pop. Set the tire pressure for riding (typically 11-13 psi), tighten the rim lock down and valve stem.
Get out and ride!

